Saturday, March 3, 2012

Hippity Hop!

This little "Hop" was just to cute to resist. 


The set included the wooden pieces and chipboard feet and nose.


I started by painting the pieces.


While the pieces dried, I cut out the printed paper that I traced for the feet and ears.  I used a round dobber to apply glue for the glittered poka dots on the "H" and "P".  From here I used hot glue to attach the feet and nose.  Modge Podge is my favorite glue for pasting down paper.  I painted the eyes and pads of the feet next.  I used a ceramic blush for the bunny cheeks.


In each of the eyes and pads I glued a small diamond rhinestone.  After tying the ribbon on the bunny, I used a large purple rhinestone in the middle.  A medium purple rhinestone is in the center of the paper flower.  The whiskers are a brown wire glued into place.


I tied ribbon on the "H" and "P" to finish it off. 

Materials:

-Echo Park Springtime Fresh Flowers (double sided) paper
-Acrylic paints:
     -White
     -Sunset Blush
     -Sweet Pea
     -Walnut
-Glitters:
     -Blush
     -Orchid
-Ribbons:
     -Purple and white scrunched ribbon
     -Wide purple toole
     -Wide cream toole
     -Wide black toole
     -Wide hot pink toole
-Blush chalk
-Mini diamond rhinestones
-Large and medium purple rhinestones
-Paper flowers
-Wire

Friday, March 2, 2012

Lady's Night


I wanted to have a get together with just the girls this month.  I made these simple invitations for the occasion.


I used the Cricut Alphabet and Preserves cartridges.  The invitation is a 3 1/2 by 5 1/2 piece of card stock with the corners rounded.  I like to get those 4 by 6 paper stacks and cut them down to whatever size I need.  Much easier.  The scalloped front of the invitation is from the Cricut Craft Room Basics and is 3 by 5.  I cut out the single and double strawberry to dress up the invite.  Of course I can't do anything without glitter, so I used a sparkles acrylic paint over the "Your Invited".  The strawberries are chalked along the outside edges to give them some depth.  At the bottom of the scalloped rectangle, I used the Cuttlebug and a poka dot embossing folder.  The ribbon is just folded over and stapled on.


I printed a little blurp about the night, my address, the date, and my phone number on the back of the invite.  Turned out pretty cute.  Of course, I am from the south, so it is going to look country no matter what!  Oh if only I had some red and white gingham ribbon...darn!

Materials:

-Cricut Preserves Cartridge
     -10 Single strawberries with layers
     -10 Double strawberries with layers
-Cricut Alphabet Cartridge
     -10 Scalloped 3 by 5 white rectangles
     -10 "Your Invited" words
-10 3 1/2 by 5 1/2 card stock rectangles
-Corner rounder punch
-Brown chalk
-Sparkles paint
-Ribbon
-Stapler
-Cuttlebug poka dot embossing folder

Thursday, March 1, 2012

Easter Egg!


Ok, so for my birthday I took a couple of days off.  Feels good.  Did whatever I wanted.  And today, I wanted to start on my Easter stuff.  I finished my door hanger first.


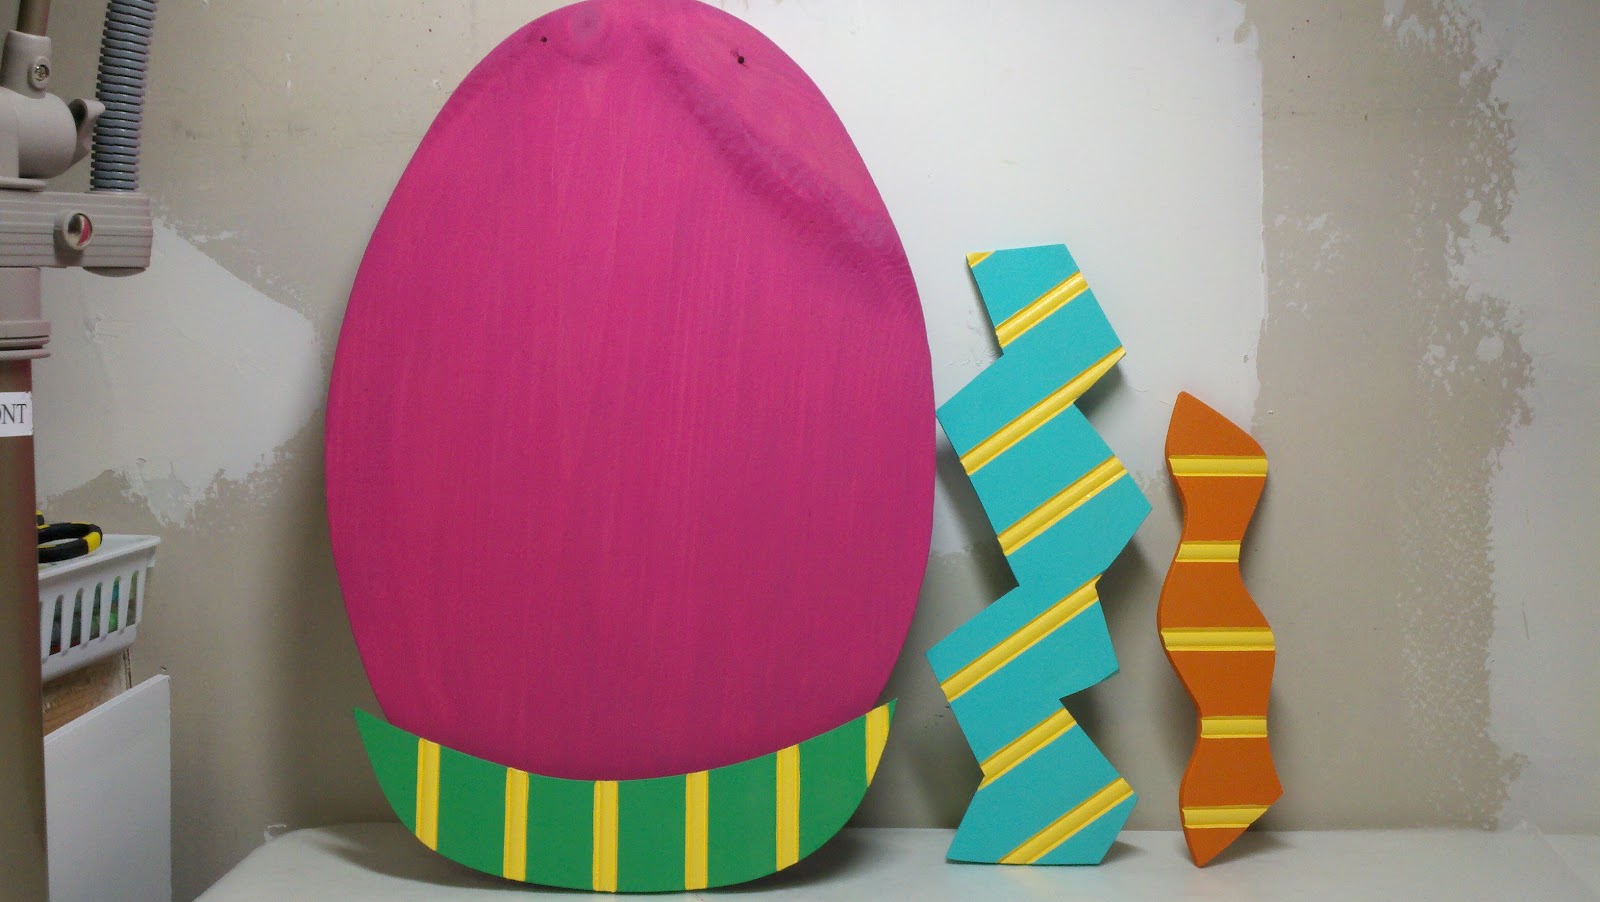
I bought the set at the wood shop.  It is pretty simple, a wooden oval and three chipboard molding pieces.  I picked out my colors to match my paper, and started to paint.  Noah was horrified.  You should have seen his face after he saw these colors...I am sure he was thinking there is NO WAY that is going on our front door...patience...but seriously I was kinda thinking that too...yuck!


Ok, so now the dress up.  I cut out my papers, and glued them down.  Again, Noah was like "why are they all crooked???"  Geez, I am not perfect...but on a important note, it really doesn't matter if they are crooked when the seams are covered by something else.  Don't judge me...it does look bad!


Let's move on from the awful crooked paper to the fun part.  Glitter!!!  Are you surprised? I put glitter on each chipboard piece, except the yellow stripes.  Remember when you use glitter, you can paint your pieces a little darker color if you don't have the exact color you want, and apply a lighter glitter.  Hence the crazy colors I picked...Once I finished the glitter, I used hot glue to attach the chipboard to the egg.


Cute huh.  I used a silver wire for the hanger.  After applying the chipboard, I put some diamond rhinestones on top of the glitter and finished it off with a bow.


One Easter Egg Door hanger C/W!!!

Materials:

-Paper:
     -Purple felt paper by Doodlebug
     -Scallops (Double sided) Summer Days by Echo Park
-Acrylic Paints:
     -Royal Fusha
     -Pumpkin
     -Turquoise
     -Spring Green
     -Crocus Yellow
-Glitter:
     -Frost
     -Mint
     -Apricot
-Diamond rhinestones
-Ribbon:
     -Yellow and green poka dots
     -Pink and white stripes
     -Purple wide toole


Happy St. Patty's Day Month!

I was thinking I needed something for my door for every month, so I have decided to start the projects.  My first month is of course March, so I went with "Luck".  Each month I will make a new door hanger project.  So.  Here we go!


The set came with the wooden "Luck" and the two overlay chipboard pieces for the "L" and "C". 


I bought 3 little chipboard shamrocks to use on this piece, even though at this point I wasn't sure exactly what I was going to do with them.  The demo that was shown when I bought this was very simple with just solid painted letters that were all a different color, with a bow at the top of the wire hanger.  I was less than impressed with this....I like fun...and glitter, so that is all I knew I wanted to do.  I painted the base and "C" in Leaf Green, and the "L" and shamrocks in Christmas green.  The buttons, or medium wooden circles, are painted in antique gold.


I started by gluing the "U" and "K" papers down.  Always work from the lowest layer up.  It can be tricky if you forget and glue the top layers down.  And remember when you paint the front of the the piece, it doesn't have to be perfect, just nice around the edges that will be shown. Next, I used hot glue to secure the "L" and the "C" over the wood piece. 


I glittered all three of the shamrocks, but still didn't know what I was going to do with them.  I also glittered my "buttons" and the "L" and "C".  I decided at this point that I wanted the "L" to have a top hat and gold buttons down it's shirt. So I cut the felt top hat in half so it would lay flat against the door.  Next I needed to add the wire since once I had the top hat glued down, I wouldn't be able to secure the wire.  So.  Wire check.  I positioned the top hat, and tied black, gold, and light green ribbon.  I left the ends long on the light green to secure the first shamrock on the top hat. I finished it off by gluing the top of the hat to the top of the "L", the buttons, and the shamrock on the "C".  I tied the remaining ribbon bow on the top, and alternated dark green and black ribbon down the leg of the leg of the "K".  Turned out great, considering I had no idea what I was going to do with it when I started! 

Materials:

-2 chipboard shamrocks
-3 wooden medium circles
-Green glittered jewel
-Ribbon:
     -wide toole gold
     -wide toole black
     -wide toole dark green
     -light green shimmer
-Black felt top hat
-Glitter:
     -pesto green
     -ebony black
-Acrylic paint:
     -Christmas Green
     -Leaf Green
     -Antique Gold


Wednesday, February 29, 2012

Caught Up!

I have finally caught up on everything I have done since November....Whew!  Tomorrow I will post my newly finished St. Patty's Day project, then its off to Easter!  Have a few super cute projects to share!  Yay!

Family

I finally got around to doing the Family wood letters that I bought a few or 6 months ago.  It seems I spend most of my crafting time doing things for everyone else!  I think it is because I am my own worst critic...and when it is for me I can't ever seem to get it right.  This time it turned out just the way I wanted.  FOR ONCE.


This particular set is HUGE...And given the place I wanted to put it, it needed to be.  The "F" is 16 inches tall.  I used printed papers from the "grandmas kitchen" line.  I wanted to use these colors for a scandinavian feel without the crazy bright orange and turquoise.  I needed something softer to tie in the colors in my kitchen.  I did manage to slide in some bright turquoise ribbon on the "F".  I kept this one simple, and the bling to a minimum.  I did manage to get some glitter in there...actually both the "F" and "Y" have glitter in them.


As much as I am not a fan of the floorplans in the homes here in Utah..pisst...they put their garages out in front of all there houses...HOW TACKY IS THAT????  Anyway, they do have these nifty nooks randomly placed in most of the houses...This one is in our kitchen/dining room over our pantry.  Turns out, I did need the big tall set.  Was a good fit!

My Wonderful Mother's Birthday Present

I had no idea what I was going to get Mom this year for her birthday.  But there were a few rules....My stepdad Frank says that Mom has way too much stuff in the house.  This "stuff" he is referring to are the decorations that make a house feel like a home.  And I definetly don't think she has too much of it! Plus mom's like it when their kids make them stuff...she still has the birds on a stick, as I call it, that I made a million years ago in summer vacation bible school...in the guest bath so everyone will see it in all it's glory.  So.  Following the "no more stuff for the house" rule, I decided to take it outside the house.  If you know my family, you know that the Utter Bunch tend to go alittle crazy on the outdoor decorations...seriously... So.  Frank never said anything about the outside:) Hehehe.  I picked up this birdhouse.  Mom really likes birds.


I painted the base color of the birdhouse sandstone, and the trim a light blue.  I drybrushed nutmeg brown, ivory, and gray over the sandstone to give it a worn look.  The trim was drybrushed with walnut and navy to make it match the paper I chose.  For me, this paper looks like my mom.  I thought it was perfect.  I hand painted the fence patches on the front and sides, going off the background pattern of the paper.  Make sure if you do something for the outdoors, that you seal it really good.  If not, your hard work goes down the drain.


Happy Birthday Mom!