The lastest project I have completed was part of a guest blog from the handy dandy wood shop where I get all of my wood pieces. Check out there blog Wood Creations;)
Thursday, May 3, 2012
Guest blog!

Wednesday, April 4, 2012
Last Bit of Easter:)
Before this year I only had two Easter pieces for my house. Both are ceramics that my grandmother made, one in 1982 and the other in 1996. I was definetly in need of a few things. This is the last Easter project, and I think I am set:)
This project is a kit that is made for a shelf. You would switch out the cutesy pieces depending on the season or holiday. I didn't really like the idea of putting this huge box shelf on the wall, but it sure does make for some pretty cute stand alone decorations:) And you get 5 for the price of one...I always like a good deal.
The set included a carrot, bunny, chick, and 2 eggs. Pretty simple but turned out better than I expected...especially since it doesn't have any glitter...and I really likes the glitter:)
Here are the unfinished pieces:


This project is a kit that is made for a shelf. You would switch out the cutesy pieces depending on the season or holiday. I didn't really like the idea of putting this huge box shelf on the wall, but it sure does make for some pretty cute stand alone decorations:) And you get 5 for the price of one...I always like a good deal.
The set included a carrot, bunny, chick, and 2 eggs. Pretty simple but turned out better than I expected...especially since it doesn't have any glitter...and I really likes the glitter:)
Here are the unfinished pieces:


I painted each piece and decided to use bright pastel papers for the eggs. I used a light brown ink to edge each of the piece. Seemed to make the pieces match my house...and as much as I like the glitter, to much can be a bad thing:)


Here are the finished pieces. I added some ribbon ( I did get some ribbon with glitter poka dots on the little bunny), and a few rhinstones on the chicky.


And that is the last of the Easter crafts...for this year that is!
Sunday, March 11, 2012
Swedish Folk Art Take 3!

Not sure why, but I think turquoise should be in any folk art painting...This is probably just my opinion, but so what.

I painted this one Turquoise and Moroccan Red. The other colors used were Antique Gold, Hunter Green, and White. Right side:

Left side:

Finished!
Swedish Folk Art Take 2!

This mini bird house turned out great. Hearts and roses.

I used Midnight Blue, White, Moroccan Red, Hunter Green, Leaf Green, Couscous Yellow, and Antique Gold.With this type of painting, there is a lot of color mixing going on. It is much easier to paint traditionally on a smooth surface. The floating doesn't turn out nicely on these rough surfaces, so no floating was done. Here is the right side:

Left side:
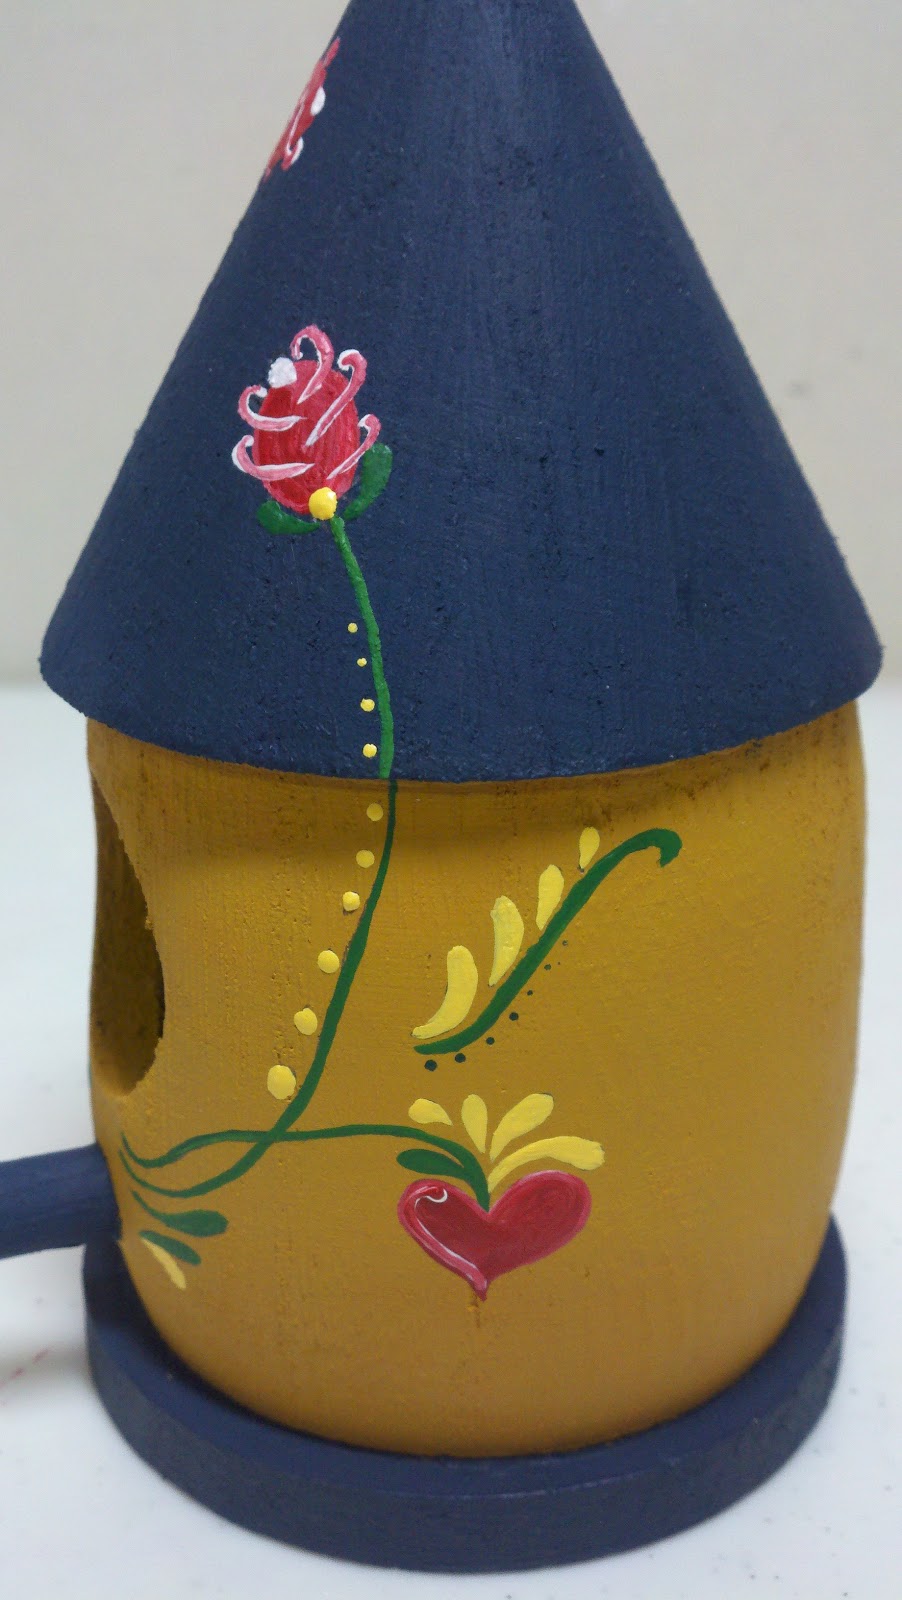
And here is the finished front.
Tuesday, March 6, 2012
Swedish Folk Art Take 1!

I bought these little unfinished bird houses at the local craft store when they went on sale (70 cents a piece!). I got one of each style, six in total.

I LOVE Swedish folk art and have painted it here and there over the years. I wanted to buy these mini bird houses and try my hand at some free hand. Here we go. I love these little buds, so this first house is just that...
I used Ivory, Wedgewood Blue, Poppy Orange, Antique Gold, Leaf and Hunter Green. All free handed, NO line art...which is what I usually do. I will sketch lightly in pencil on my piece before I ever put paint to anything. It is a comfort thing for me...I HATE having to redo anything, and I am the pickiest person I know. And I think it turned out quite nice. Simple. Love it...Wonder who will end up with this cutesy little birdie house???
Sunday, March 4, 2012
Is It Summer Yet?
I really wish it was...I am tired of the snow on the ground...and the cold...and the kids cooped up in the house...So I was rummaging through my bin "o" wood in my craft room when I came across a "Summer" I bought a few months...or maybe two years ago...but who's counting. Having five days off from work can get you caught up on your bin "o" wood...especially if you don't visit the handy dandy wood shop. This one is really simple, and for once, no glitter...sad...

The set came with the wooden letters and the three wooden knobs.

I started by painting the letters and knobs. If you want a washed look, you can add a bit of water to your paint. You will be able to see the wood grain though the paint. Here's another hint...If you have pieces that are round (like wooden knobs), you can place them in a round paint tray to dry. If you don't have a paint try, you can use an egg carton. Ok, moving on...

I used garden themed papers that were double sided. It makes it easier to coordinate your papers if you get them in a set. I always trace my letters before I paint, and cut them out while my pieces are drying. Pencil marks get on the wood and then you have to touch up if you have already painted. I used a chalk ink to distress my paper before I glued them on the wood letters. It is easier for me, and also I tend to mess up when I ink stuff...it is really hard to get paper off wood when you use Modge Podge...

To dress up this set, it was pretty simple. Hot glue the peas (knobs) on top of the "U" or pea pod. I must insert here that Noah at first thought this was suppose to be watermelon...and was wondering what the wooden balls were for. And before I am too harsh, it totally could have been a watermelon slice....

Three paper cut flowers, a heart, and a button for the flower. I inked each flower and used glue dots to assemble them. You can bend the petals for a 3D look. Cut your heart in half to make the flower's leaves and top off with a button on top.

I tied a cute little spade on the "R" with a thin piece of twine.

And then whala!
Materials:
-Garden scrapbook papers (double sided)
-Acrylic paint:
-Ivory
-Christmas Green
-Gingerbread chalk ink
-Twine
-Garden tool charm
-Button
-Paper flowers (small, medium, and large)
-Paper heart
Saturday, March 3, 2012
Hippity Hop!
This little "Hop" was just to cute to resist.

The set included the wooden pieces and chipboard feet and nose.

I started by painting the pieces.


I tied ribbon on the "H" and "P" to finish it off.
Materials:
-Echo Park Springtime Fresh Flowers (double sided) paper
-Acrylic paints:
-White
-Sunset Blush
-Sweet Pea
-Walnut
-Glitters:
-Blush
-Orchid
-Ribbons:
-Purple and white scrunched ribbon
-Wide purple toole
-Wide cream toole
-Wide black toole
-Wide hot pink toole
-Blush chalk
-Mini diamond rhinestones
-Large and medium purple rhinestones
-Paper flowers
-Wire

The set included the wooden pieces and chipboard feet and nose.

I started by painting the pieces.

While the pieces dried, I cut out the printed paper that I traced for the feet and ears. I used a round dobber to apply glue for the glittered poka dots on the "H" and "P". From here I used hot glue to attach the feet and nose. Modge Podge is my favorite glue for pasting down paper. I painted the eyes and pads of the feet next. I used a ceramic blush for the bunny cheeks.

In each of the eyes and pads I glued a small diamond rhinestone. After tying the ribbon on the bunny, I used a large purple rhinestone in the middle. A medium purple rhinestone is in the center of the paper flower. The whiskers are a brown wire glued into place.
I tied ribbon on the "H" and "P" to finish it off.
Materials:
-Echo Park Springtime Fresh Flowers (double sided) paper
-Acrylic paints:
-White
-Sunset Blush
-Sweet Pea
-Walnut
-Glitters:
-Blush
-Orchid
-Ribbons:
-Purple and white scrunched ribbon
-Wide purple toole
-Wide cream toole
-Wide black toole
-Wide hot pink toole
-Blush chalk
-Mini diamond rhinestones
-Large and medium purple rhinestones
-Paper flowers
-Wire
Subscribe to:
Posts (Atom)